Making VBS Registrations a Breeze with Planning Center
Any event that only happens once a year tends to bring unique challenges and surprises, as well as things you wanted to do differently the next time but completely forgot about. For many years at our church, that was registering kids and volunteers for VBS. We knew we wanted to improve our workflow, but June would roll around and we'd forget the problems we had the year before and not have time to make changes and thoroughly test them.
However, over the past couple years we've ironed out a process that's finally working really well. I want to give a fairly in-depth look at how we use several Planning Center modules together to make it work. While we use this workflow for our VBS registration, it provides a framework that could be used for all sorts of other events.
This article makes a big assumption - that you're using Planning Center and have access to the Registrations, Check-ins, People, and Groups modules. It also assumes you're hosting an event (like VBS) where you have a mix of kids and adult volunteers who need to sign up.
Table of Contents
Overview
The basic system works like this:
- A single Planning Center People form is used to register both kids and volunteers, and can be used to register an entire household in one shot. The form collects all the information we'll need for each attendee - whether that person is a volunteer, a kid, or a mixture of both.
- A staff member reviews each submission and assigns kids to crews and volunteers to open positions.
- When a volunteer is placed into a specific volunteer role, they're automatically added to a corresponding Planning Center Group, which is then used for communication and resource sharing within that specific role.
- A Check-Ins event is created from the Registrations signup, and check-in locations are created automatically from all the kid crews and volunteer roles created in the Registrations signup.
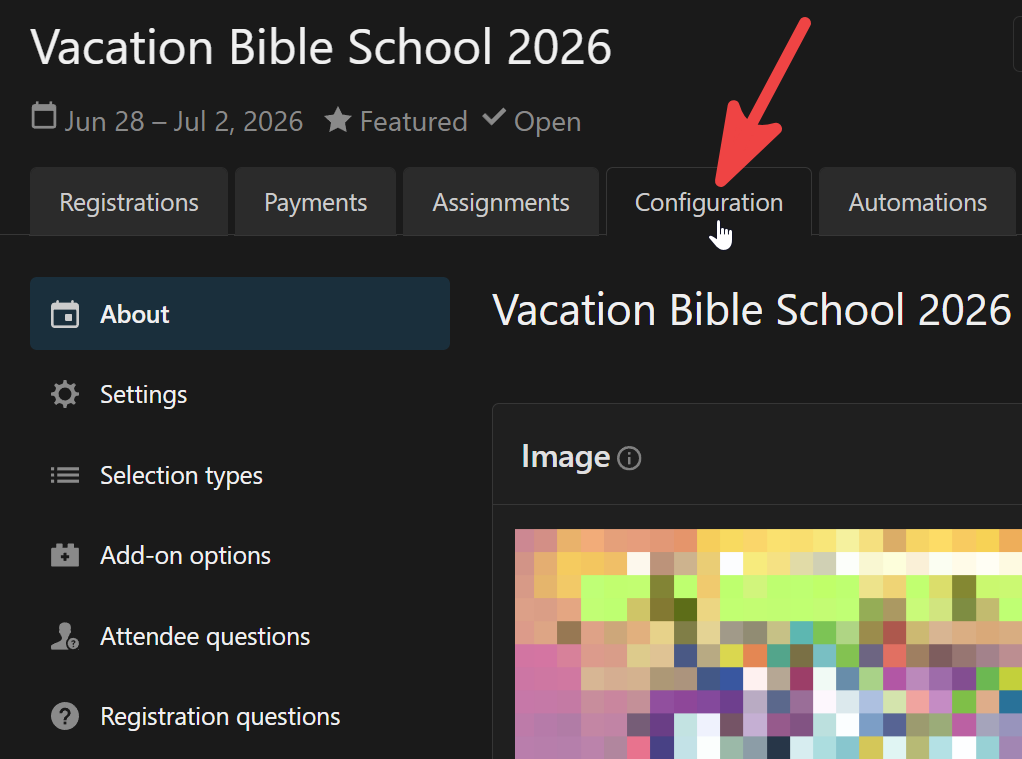
Configure Your Signup
Once you've set up your signup in Registrations the first time, you can simply duplicate your previous signup event and change the relevant details. But since we're creating this signup for the first time, we'll need to set it up from scratch.
Once your signup has been created, you'll use the About and Settings sections under the Configuration tab to add dates/times for your event, add details, decide how your signup will appear on the Church Center app, and other basic setup options.

Selection Types
Since we want to use a single form for volunteers and kids, we'll need to use two different Selection Types (under the signup's Configuration tab). This allows each registrant to be filtered into one type or the other. You can create specific "restrictions" for each selection type (like age, gender, or grade), so you can make sure that adults don't accidentally sign up as child attendees and kids don't sign up as volunteers.
Selection Types vs. Assignment Types
Selection Types are the first option someone can "select" when signing up. This changes what follow-up information is collected during the registration but otherwise has no other impact on the Registration or Check-Ins event.
Assignment Types and Assignment Areas allow registered attendees to be filtered into different groups/roles. If the signup is linked to a Check-Ins event, these roles (Assignment Areas) can be carried over to the Check-Ins event automatically as locations, and those assignments can then be printed on name tags.
Another important section on the Selection Type page is the area marked Personal Information to Collect. If you don't want to have to hound parents to find out a child's grade, emergency contact info, or medical notes later, you can require this information at the time of registration.
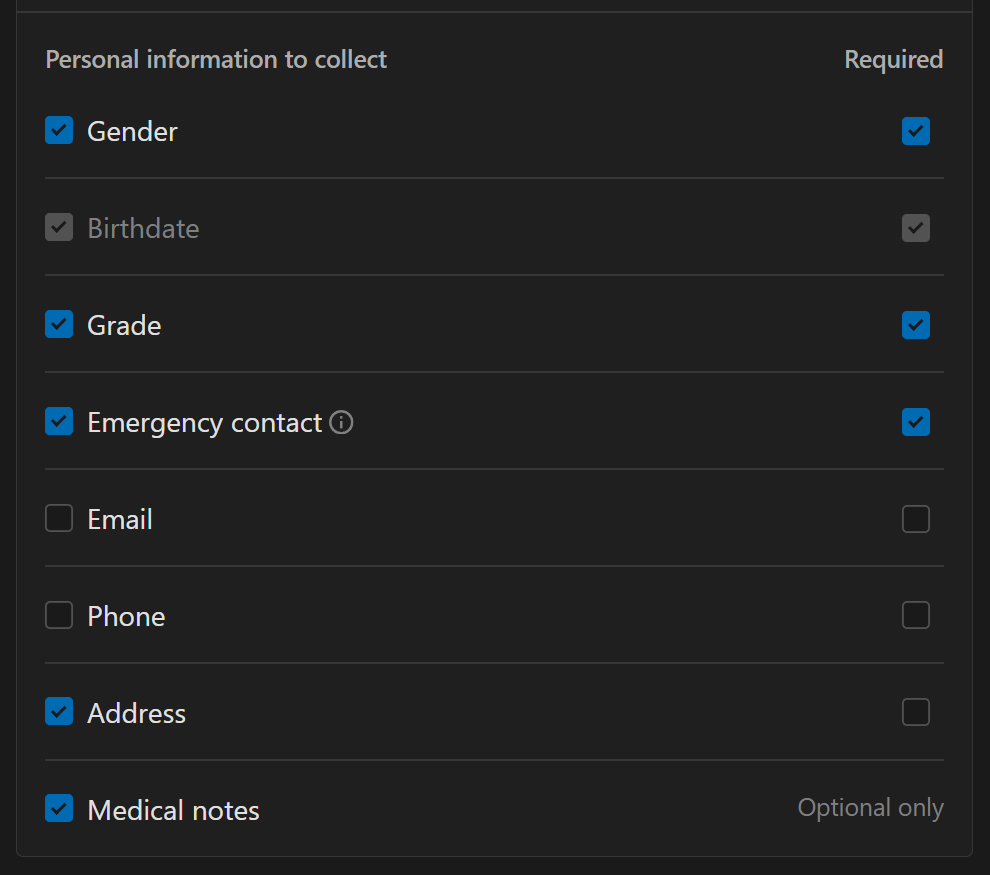
Note: Including Medical notes is particularly convenient because it updates the built-in medical notes field on that person's Planning Center People profile. This data can then be included on kids printed name tags to alert volunteers of medical issues to be aware of.
Attendee and Registration Questions
Next we'll move on to Attendee Questions and Registration Questions under the Configuration tab. What's the difference?
Attendee questions are asked for each person on the registration, while registrations are asked only once per registration. For example, we'll use attendee questions to collect information like:
- What way(s) do you want to volunteer?
- What evenings are you available to serve?
- Is there any information about your child that would be helpful for us to know?
Each attendee question can be restricted to a specific selection type, so only people who select the "volunteer" selection type will be shown the questions about volunteering, and questions pertaining to kids will only be asked for people who selected "child attendee". This helps keep the form compact and not overwhelming while still collecting a lot of information up front.
On the flip side, we'll use a registration question to ask whether the family regularly attends our church, another church, or no church. Making this a registration question means the person registering their family only has to answer this question once, not for each person they're registering.
Assignment Types
Clicking on the Assignment Types tab will take us to one of the more confusing parts of the setup, but where the bulk of the manual work will happen later when assigning volunteers to specific roles and kids to specific crews.
Each assignment type has any number of Areas that you can add. There are two important things to note about Areas:
- Each attendee can be assigned to a single area within each assignment type.
- Each area becomes a specific check-ins location when linked to a Check-Ins event.
Why is this second point so helpful? For VBS, we print name tags for every child and every volunteer. The kids' tags show their name, any important medical info, a security code (for check-out) and the crew that they've been assigned to. Volunteer tags show their name and the volunteer role in which they're serving. In order to show this information, kids and volunteers need to be checked into the correct "location". Instead of having to duplicate all of the crews and volunteer roles in the Check-Ins event and make sure kids are assigned to the right location, Check-Ins automatically pulls this information from the linked signup. Essentially, by using Assignment Types and Areas in your signup, you've already done the bulk of the work in setting up your Check-Ins event.
We use two assignment types: Volunteers and Crews.
Within the Volunteer assignment type, we'll have dozens of assignment areas for all of the specific roles available during our VBS.
- Tech
- Band
- Crew Leaders
- Snack
- Craft
- Teacher
- First Aid
- Crew Leaders
- Registrations/Check-ins
- Parking
- etc.
Note: You may have wondered earlier why we use an attendee question to ask how someone wants to volunteer instead of creating specific selection types for each volunteer role that would allow a person to directly sign up for a specific role when registering. It seems like it would save time, and in a perfect world it would. However, we need the flexibility to assign people to roles that need to be filled instead of running into a situation where half of our volunteers sign up to help with snack, and we end up with no-one signed up for helping with tear down at the end of the week. Most people are pretty flexible in the ways they're willing to serve and trust leaders to place them where they're most needed.
Likewise, within the Crews Area, we'll have dozens of crews that we can manually assign kids to based on grade, friend preference, kids who we know should not be in a crew together for the sanity of their crew leader, etc.
As people use the signup form to submit their registrations for their families, our VBS Coordinator will begin to sort kids into crews and volunteers into roles. It's important to note here that there's currently a limitation with this workflow that requires a slight workaround. Selection types cannot be used to limit what assignment types a registrant will be placed into. Instead, every registrant will be put into all assignment types. This means when selecting the Volunteer assignment type, you'll see kids mixed in with volunteers. However, you can simply sort the list by selection type when looking for volunteers who have registered but haven't yet been assigned to an area. All child attendees in the Volunteer assignment type will simply remain "unassigned". This means you can't rely on the number of unassigned people as this will include all registrants, both kids and volunteers.

Setting Up and Using Groups
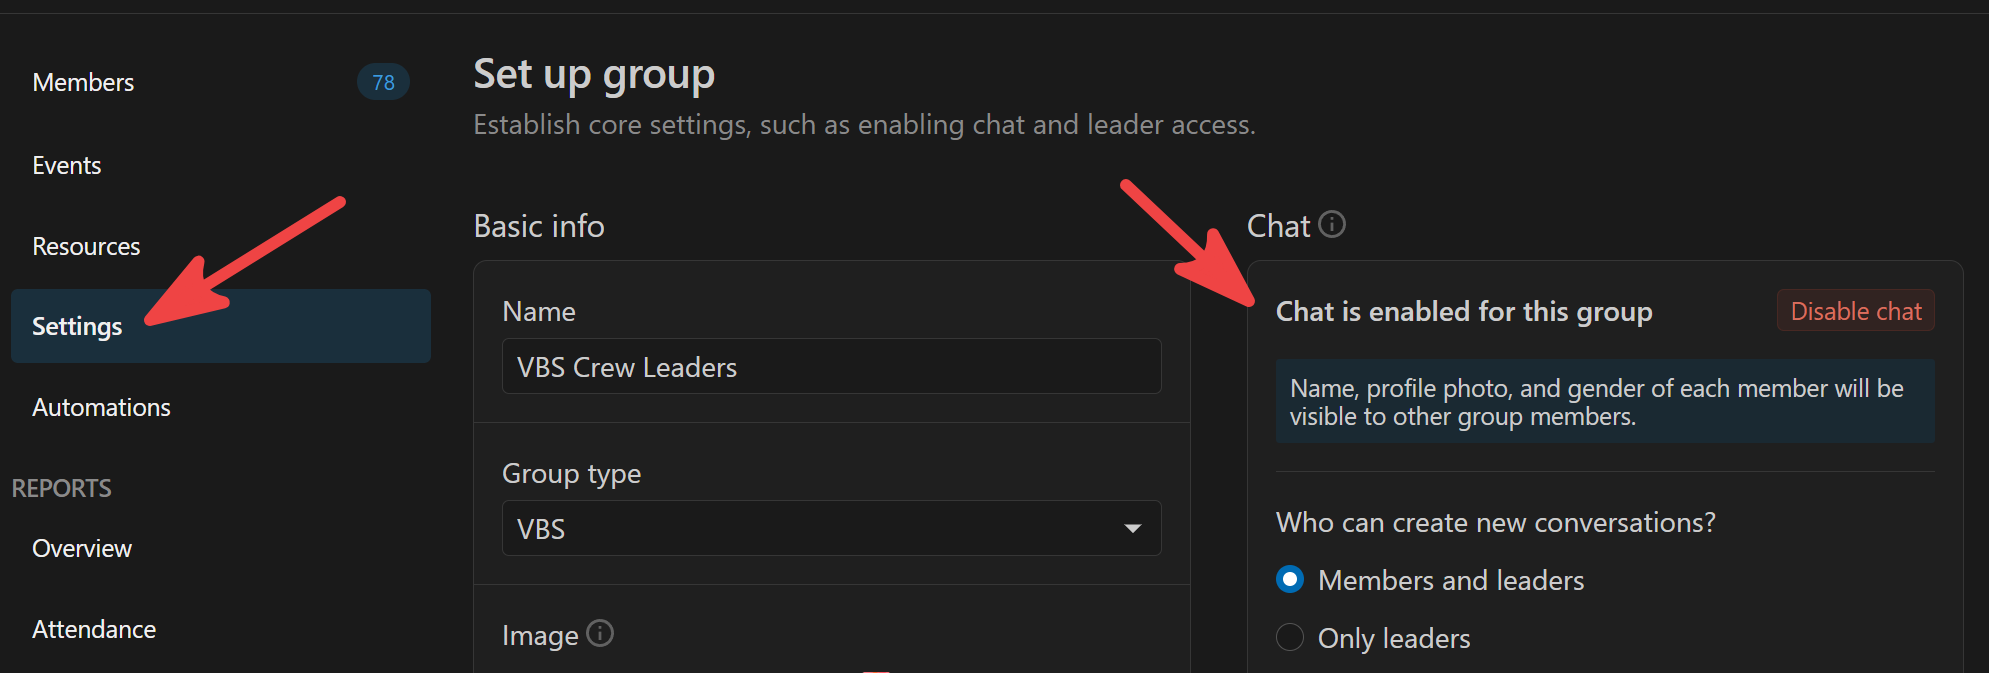
Having some of your volunteers added to specific Planning Center Groups makes communication simple within that group. To be clear, we don't create a group for every volunteer role - only ones who's volunteers will need to communicate amongst themselves, or ones who's volunteers will need specific resources.
For example, we have group for all of the Crew Leaders. In their Group resources section, our VBS Coordinator can upload files that just pertain to those volunteers. Likewise, there's a Craft Volunteers group that allows them to easily coordinate (via the chat feature in the Church Center App) to make sure craft materials are ready to go each night.
Go ahead and create a Group for each volunteer role you want to automatically sync to a volunteer assignment area from your signup. In the group's Settings, be sure to enable chat and select the option to allow Members and leaders to create new conversations.
You can also upload PDFs or add links to the Resources section of the group to share relevant items with that group of volunteers.
Once a volunteer is added to a group (via the automation that we'll set up in the next step), they'll see the group in their Church Center App or on the Church Center website. From there they can access resources and chat with the group.
Lists: The Automation Layer
Assigning volunteers to specific roles (assignment areas in registrations) AND adding them to specific groups is a lot of work. Thankfully, automations in Planning Center can make this process simple after a little bit of setup. I'll walk through exactly how to set up the automation for a single group, then the process is simply repeated for each group you want to sync.
The automation relies on a List in Planning Center People that is automatically populated with volunteers who have been placed in a specific assignment area in the Registrations signup. An automation is then added to this list that adds a person to a specific Group when they're added to the list. Likewise, when someone is removed from the list, they'll be removed from the Group.
Create Your List
For this example, we'll assume you have a volunteer role for craft helpers that has an assignment type called "Volunteer - Craft" in the Registrations signup. We'll also assume you have already created a group in Planning Center Groups called "VBS Craft Volunteers".
- In the Planning Center People module, create a new List and give it a name, like VBS Craft Volunteers.
- Create a rule for your list that includes people with the "Volunteer - Craft" assignment type.
- Select Registrations > named attendee for > a specific event > your event > with the assignment in > Volunteer - Craft. Make sure the include active attendees box is checked.
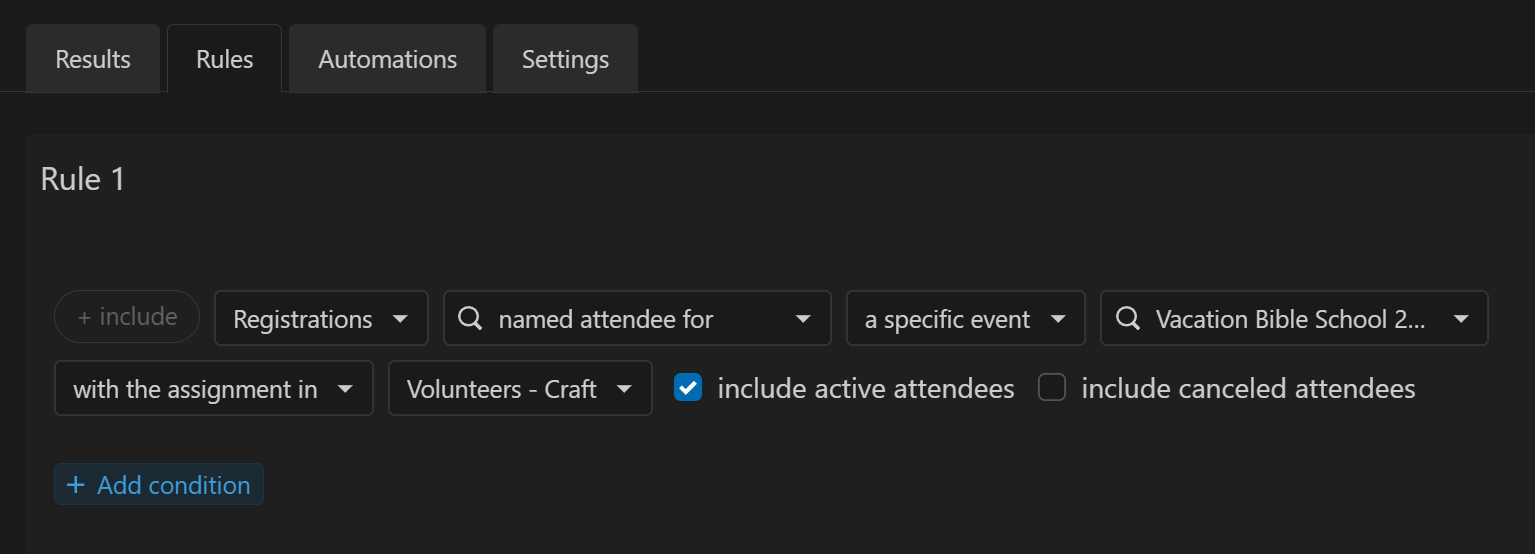
Create a rule in your Planning Center People list to filter specific volunteer roles from your signup.
- Select Registrations > named attendee for > a specific event > your event > with the assignment in > Volunteer - Craft. Make sure the include active attendees box is checked.
- Save your rule, then head over to the Settings tab.
- In the Auto-refresh settings section, select Enable auto-refresh and set the frequency to Nightly.
- Move to the Automations tab and click the Create automation button, then use the following settings:
- When a person... is added to this list
- Then perform an action in... Groups > Add to group > VBS Craft Volunteers > Role > Member.
- It's probably a good idea to enable the Notify member option to give the person a heads up that they've been added to the group.
- You should also select the option to Apply this action to current members on the list.
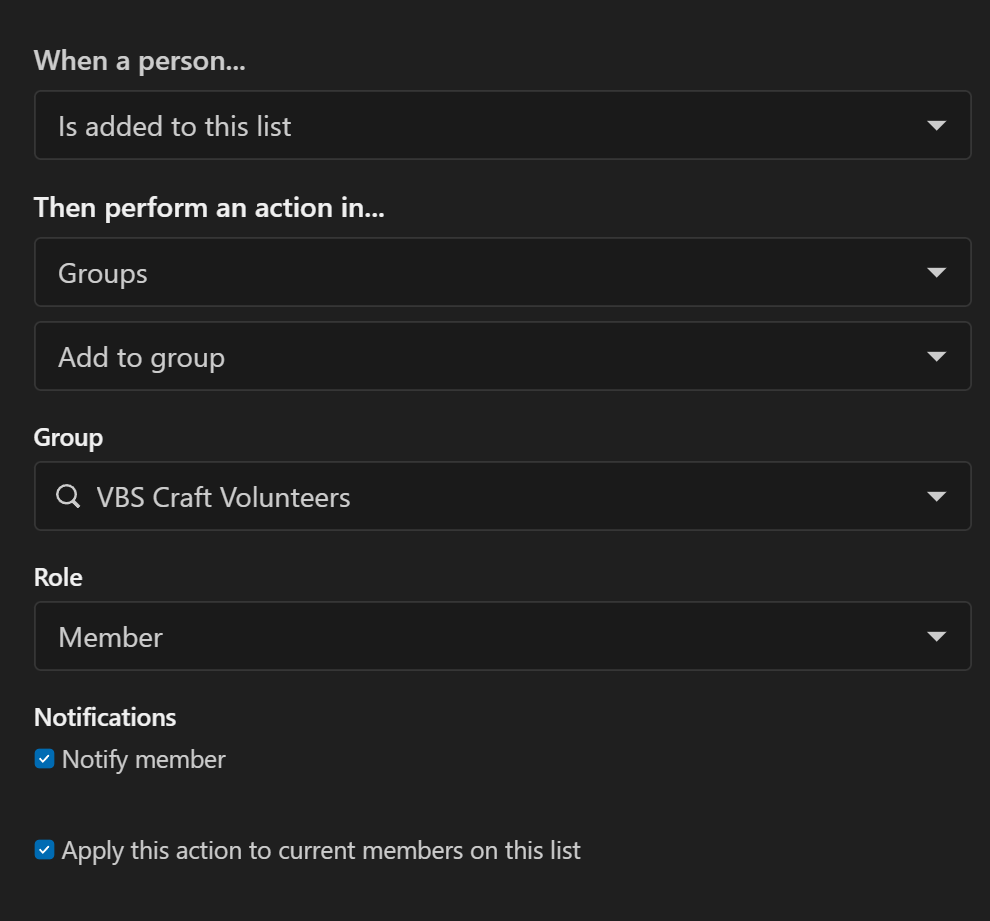
Add an automation to put people in a corresponding group when they're added to the list.
- Then create a second automation with the following settings:
- When a person... is removed from this list
- Then perform an action in... Groups > Remove from group > VBS Craft Volunteers.
- There's no real need to enable the Notify member option - when removed from the group, a person simply won't see the group in their Church Center App anymore.
Once your two automations are set up, your list will update every night, staying up-to-date with anyone assigned to the Volunteer - Craft area and automatically adding/removing those people from the corresponding group.
You can repeat this process for as many volunteer roles as you'd like. Alternatively, you could create a single "All VBS Volunteers" list and group if you don't need the granularity of multiple volunteer groups. In that case, you could create your list rule by selection type > volunteer instead of by assignment area in your list rule. Just know that anyone who registers as a volunteer will end up in the group, even if you ultimately end up not using them in a volunteer role.
Note: If your church isn't already widely using Groups and the Church Center App, it's worth taking some time to train your volunteers on the app and its capabilities. It's also worth making sure they have the Church Center App installed with notifications enabled so they don't miss important communications.
Check-Ins
This is the final piece of the puzzle and requires very little configuration. Since this article was focused primarily on the automations and links between Registrations, People, Groups, and Check-Ins, I won't go into too much detail here past creating the Check-Ins event.
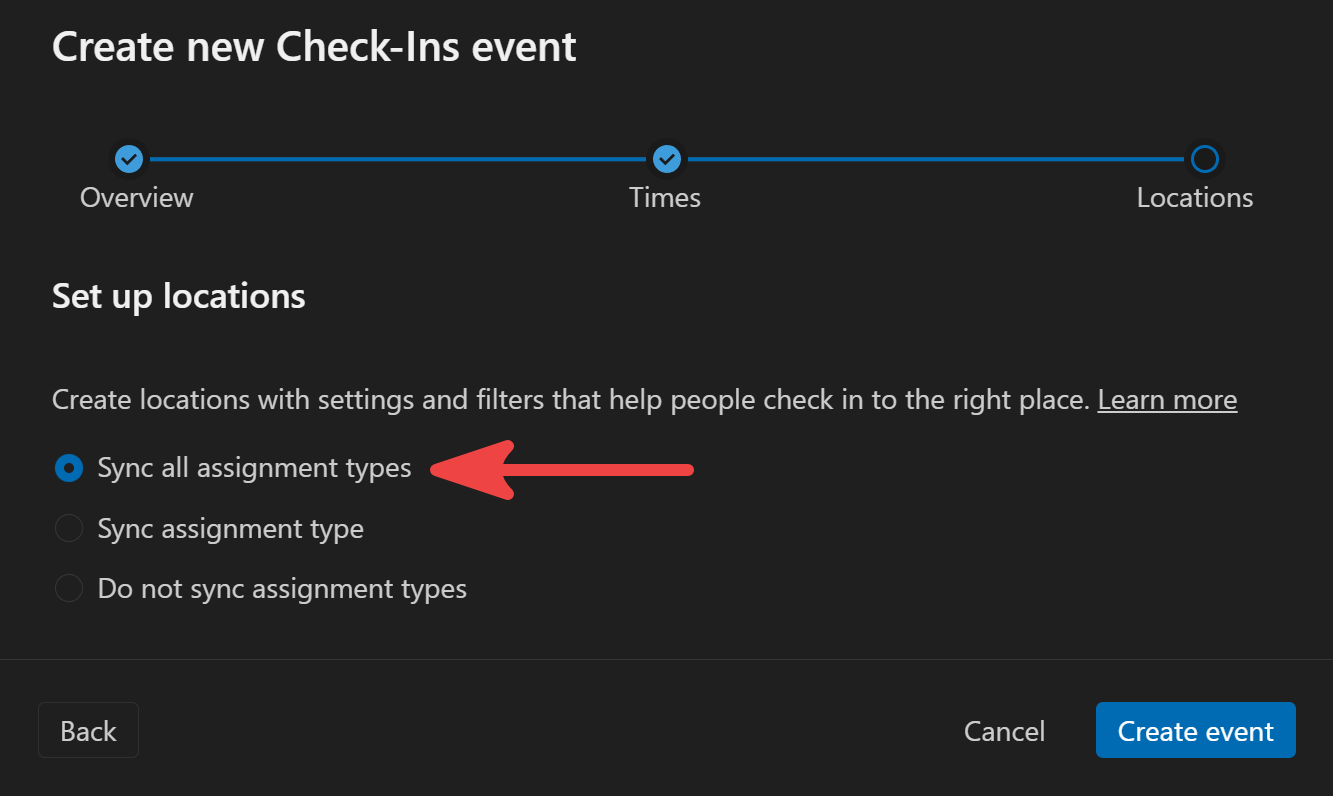
In your Registrations signup, click the Configuration tab then select the Check-Ins option at the bottom of the menu on the left side. Click the Create Check-Ins event button then follow the prompts to create the event in Check-Ins and add times. The final step in creating the Check-Ins event is the most important - syncing locations. Make sure the Sync all assignment types option is selected. This will ensure that a location is created for each area for both assignment types (kids crews and volunteer roles). If you don't do this, you'll spend a lot of time manually creating every location in the Check-Ins event.
Of course you can then visit the Check-Ins module and further tweak your Check-Ins event, modifying labels, determining which labels print for each location, setting restrictions for each location etc.
Conclusion
While this example was for a pretty specific use case, it helps show the power and interactivity of Planning Center's various modules. Using their built-in, simple automations can save you and your team tons of time.
What other ways are you using Planning Center automations to reduce busy work for your team? Let me know in an email to [email protected]. I'd love to get more ideas.