Account Security for Teams: A Practical Example

In the first article of this two-part series, I discussed why account security is important and gave a broad overview of passwords, multi-factor authentication, and password managers. In this article I'll dive into specifically how you can implement these principles in your organization. Keep in mind, there are countless tools and workflows you could use to accomplish the same purpose, so while what I describe here has worked well for us, I'm not suggesting that this way is the only way. I hope this simply provides a helpful example of how your team might be able to implement some stronger account security practices.
Updated on April 8th, 2026
Under 4.4.2 Inviting Users, added instructions for user account recovery in cases of a lost master password or trusted device.
Table of Contents
The Big Picture
The goal at the end of this article is to have implemented a team-based password manager where:
- each user has their own account to access the password manager
- each user uses an authenticator app on their phone in order to access the password manager
- all account passwords are strong and unique
The Starting Point
If you don't already have a solid password manager workflow instituted, you may have a variety of existing methods to deal with. Things like:
- a shared password spreadsheet (maybe it's even password protected!)
- sticky notes scattered on desks
- using web browsers to store passwords
- some team members using their own password manager
- lots of password resets via email
- constantly asking each other what the password is for an account
- one or two passwords for absolutely every account that everyone has memorized
It's going to be hard to break existing habits and get everyone on board with new ones, especially when it comes to asking them to do something different and slightly less convenient. So step one is...
Get everyone on board
If you'd like to incite a mutiny, go ahead and delete the password spreadsheet that everyone uses, change all the passwords to all the accounts, and deploy a password manager that no-one knows how to use or even knows exists. On the other hand, assuming you like your coworkers and are keen on serving your church, there is a better way.
You'll have a much easier time getting people to change their habits and accept a new routine if you can help them understand the importance of the change, get them invested in the process, and do the legwork to make the transition as painless as possible. Finally, once the switch is complete, don't leave people stranded with a new, unfamiliar process. Provide on-going training and troubleshooting.
Let's unpack each of these steps.
Explain the "Why"
While people might still complain about the change, if they understand the negative consequences of having an account hacked, they'll be more likely to appreciate the effort you're going to to help keep them safe. You could start by inviting each person to read part one of this series. Help them understand that taking security seriously is one way they can help steward the resources of your church. Any time and money spent recovering and mitigating problems from hacked accounts is time and money not spent shepherding your congregation.
Explain the Rollout Process Well in Advance
Don't spring this project on your team with a planned deployment later that afternoon. Instead, write out a plan that let's them know exactly what to expect and when. Let them know about the upcoming changes, what steps they'll need to take, and that you'll be there to help them through the entire process. If your team is small enough and it's feasible, meet with each person individually and walk them personally through the process.
Roll Out Slowly
Once you've planned your deployment, test it thoroughly. Know exactly what the process will look like, not only on the admin side, but for the end user as well. Try it out with some test users (either willing guinea pigs or with some of your own personal accounts) on a variety of devices (MacOS, Windows, Android, iOS). And see if you can find ways to break it. Find every flaw you can in the process so that when a hiccup does inevitably happen for an end-user, you've got a fix ready to go.
Train Your Team
I'm a big fan of providing both written and video instructions for processes that I ask people to follow. And when possible, I like to personally help each team member get setup with any new process. This gives them an opportunity to ask questions, and it gives you a better sense of how easy (or how difficult) your process is for an end-user to follow.
- Help them create their account and enable two-factor authentication.
- Help them install the Bitwarden app on their phone and the extension in their browser.
- Make sure they know how to generate a strong password and save a new item in their vault.
- Make sure they know how to generate and save two-factor authentication codes for items in their vault.
Example Deployment
For this example, we're going to use three primary tools:
- For a password manager, we'll use Vaultwarden, a self-hosted, light-weight version of the open-source Bitwarden.
- Instead of the complexity of hosting our own Vaultwarden server, we'll use a paid service called Pikapods, designed to make hosting web apps incredibly simple, while still far less expensive than using the official Bitwarden service.
- For two-factor authentication, we'll demonstrate with 2FAS.
Note: It's important to understand the difference between Bitwarden and Vaultwarden. Bitwarden is an open-source password manager for "securely storing, managing, and sharing sensitive information such as passwords, passkeys, and credit cards", according to bitwarden.com. While the Bitwarden software is free to host if you have your own server, you can instead choose to pay Bitwarden to use their servers instead. Vaultwarden is a slightly stripped down variant of Bitwarden that can be hosted using less resources. It's still open source, contains all the core features of Bitwarden, and is fully compatible with Bitwarden mobile apps, desktop apps, and browser extensions. And it happens to be the version available on PikaPods, which is why we're using it.
PikaPods
PikaPods provides app hosting for a minimal fee, but takes care of all of the hard work of setting up a server and making sure your app stays up to date. Additionally, you don't have to worry about relying on your own organization's hardware or internet connection to keep the server up and running. However, if you already have a server and you're comfortable deploying apps, you can skip this step and install Vaultwarden on your own server.
Let's start by creating an account with PikaPods. There's no fee to sign up, and you'll get a $5 credit which is enough to run a Vaultwarden server for a couple months, so there's no up-front financial commitment if you just want to try it out. For comparison, if you were to use Bitwarden's own Business Team plan, it would cost you $4 per user per month. So for example, if you have ten staff members, your monthly cost would $40/mo vs. about $2/mo using PikaPods.
Note: Bitwarden does apparently offer discounts for non-profits, but their discounted rates aren't published on their website. If you're a non-profit and need some of the few Bitwarden features that aren't available in Vaultwarden (like single sign-on), it's worth reaching out to Bitwarden support to see what kind of discount they might provide.
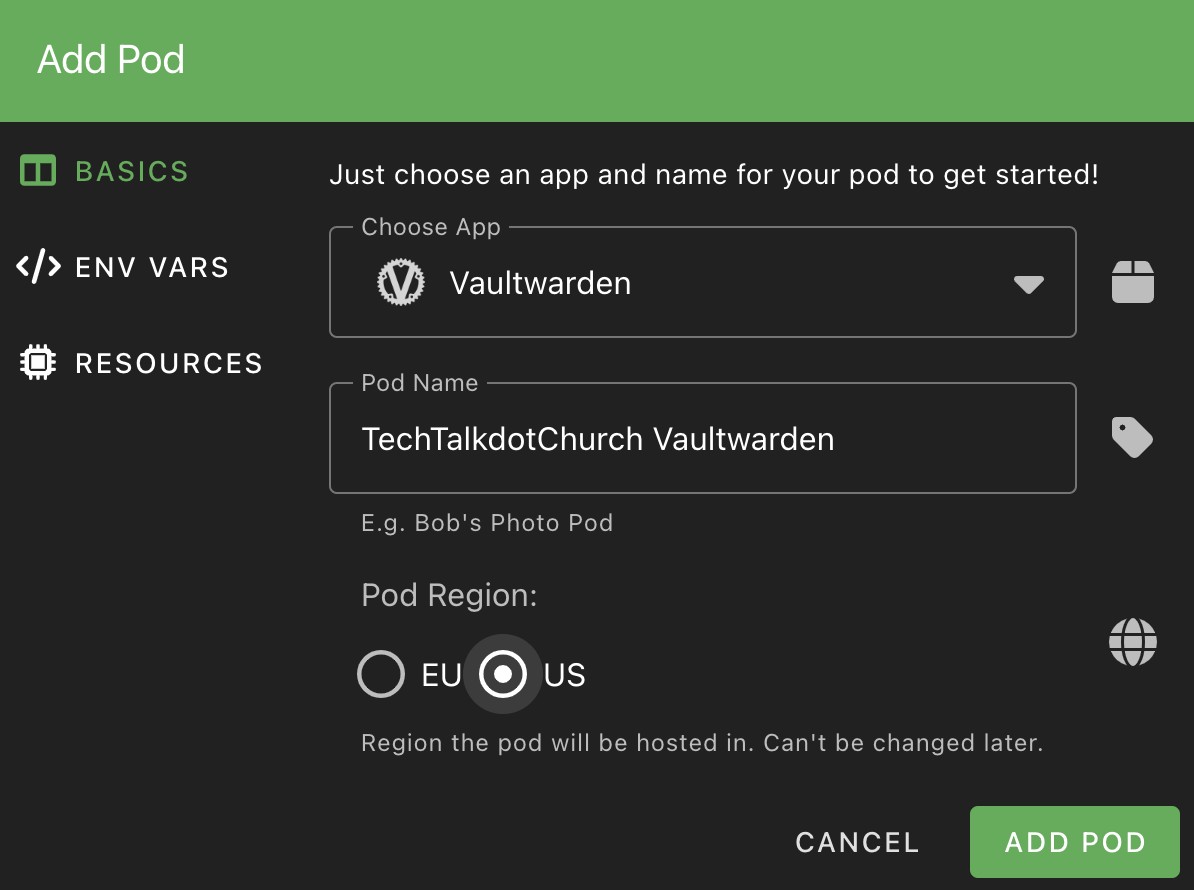
Once you've signed up, you'll click the +ADD POD button and select Vaultwarden from the drop-down pod list. Give your pod a name and select the appropriate region. The ENV VARS tab allows you to set some initial parameters, but we'll talk more about these later. The Resources tab will be adjusted automatically based on the app you've selected, so you can leave that as is too. Your monthly cost is based directly on the CPU, memory, and storage resources you select, so start with the minimum since you can easily increase these later.
A few seconds later, you'll have your own password manager running in a server that you don't have to manage. To access your shiny, new Vaultwarden instance, open the URL next to where it says Domain or click the OPEN POD button. You'll be greeted with the Vaultwarden login page. This is the same link you'll give each of your team members to sign up for their Vaultwarden user account.
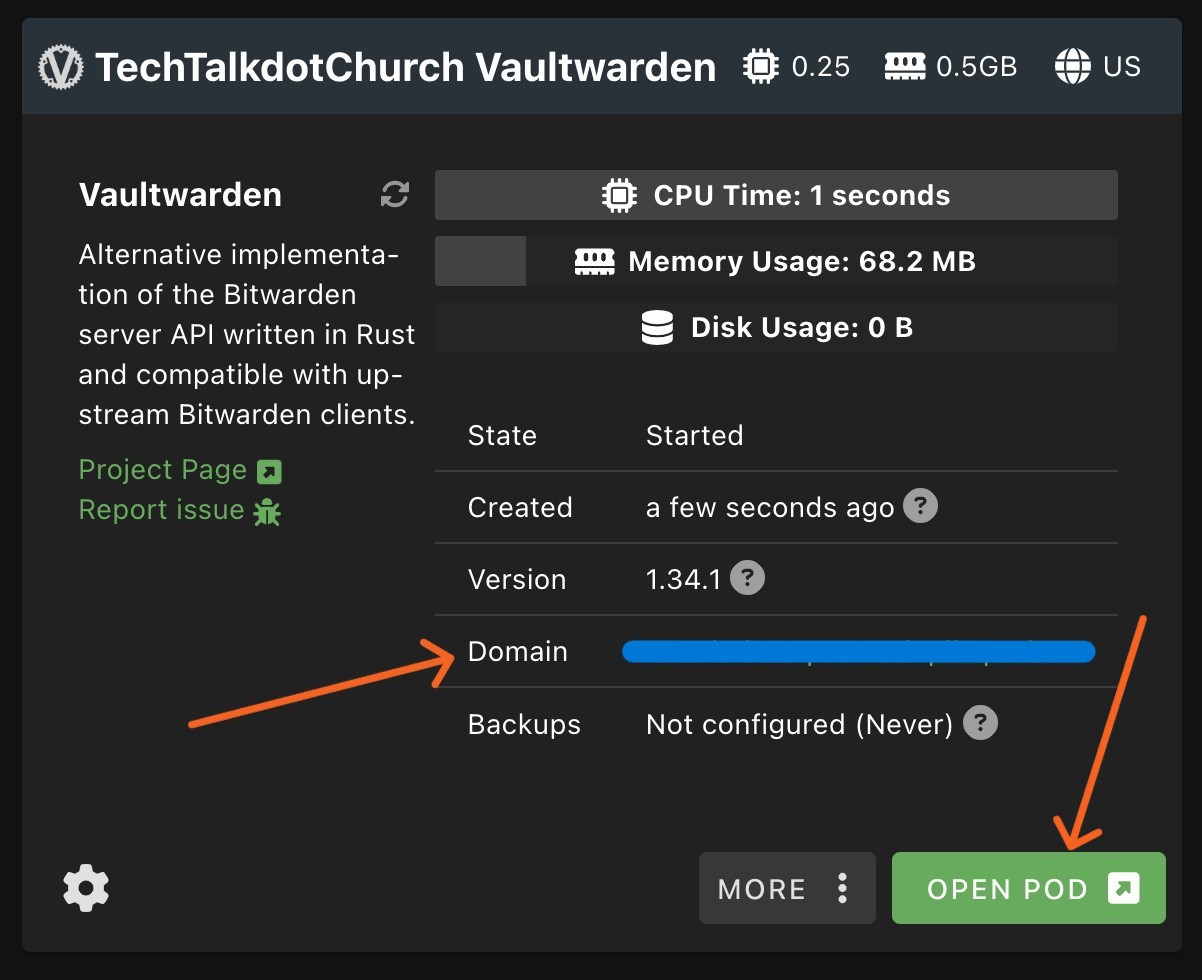
Note: You can use a custom domain name instead of the domain supplied automatically by PikaPods to access your Vaultwarden server. Simply click on the settings icon on your Pod, click the DOMAIN tab, select the Enable Custom Domain button, then follow the steps to verify and link your custom domain. Alternatively, you can simply customize the part of the URL that precedes the .pikapods.net.
For example, if I didn't have a custom domain but wanted something easier to remember, I could change the URL to techtalkdotchurch.pikapods.net. Or, in my case I can point the Pod to something like vault.techtalk.church.
Vaultwarden Initial Setup
You'll need to start by creating an owner account. Choose a username and master password. Remember, this master password is what unlocks your vault, so make sure it's not a password you've used before, and make sure it's strong, but memorable. (If you need help remembering how to create a strong password, refer to part one of this series.)
Now that you're logged in, let's get your account secured and make sure you've got a way to recover it.
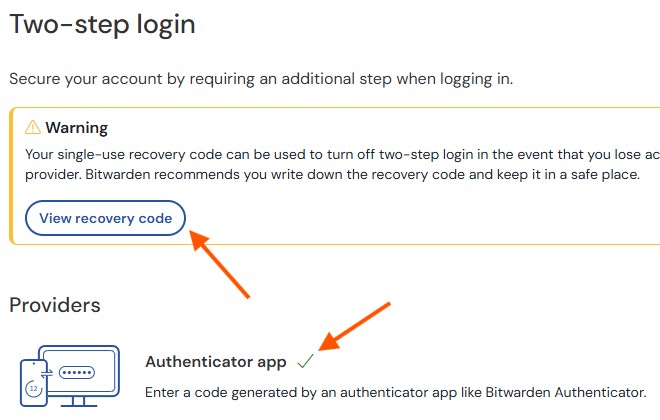
First, open the Settings menu on the left hand side and select Security. Then navigate to the Two-step login tab, and click the Manage button next to Authenticator app. You'll need to enter your master password to continue.
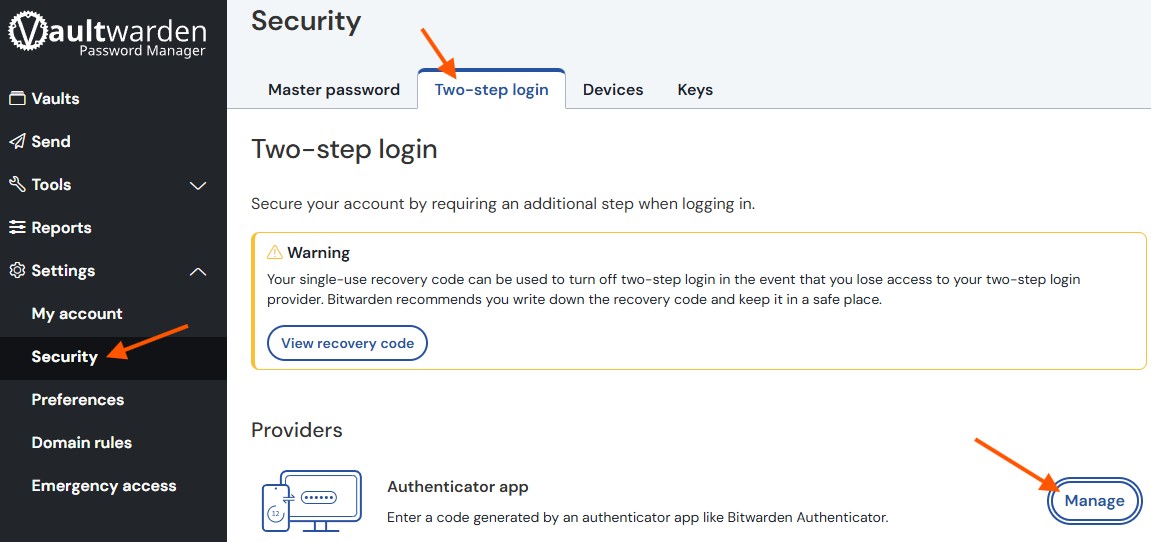
You'll see a pop-up window with a QR code and a key (a long string of random characters). You'll use one or the other to add the account to your authenticator app. So let's go get that authenticator app.
2FA with 2FAS
If you already have an authenticator app on your phone, great. If not, go ahead and download 2FAS or one of the other many authenticator apps (Authy, Google Authenticator, Microsoft Authenticator, or even Bitwarden's own authenticator app) available free for Android or iOS. There are also desktop and browser extension variants, but having it on your phone offers the most convenience. I'll demonstrate with 2FAS but the process is largely the same with any of them.
Note: It's a good idea to add a layer of security to access your authenticator app on your phone. Many of the authenticator apps will allow you to require that you enter your screen lock (whether a pin, fingerprint, or facial recognition) when opening the app.
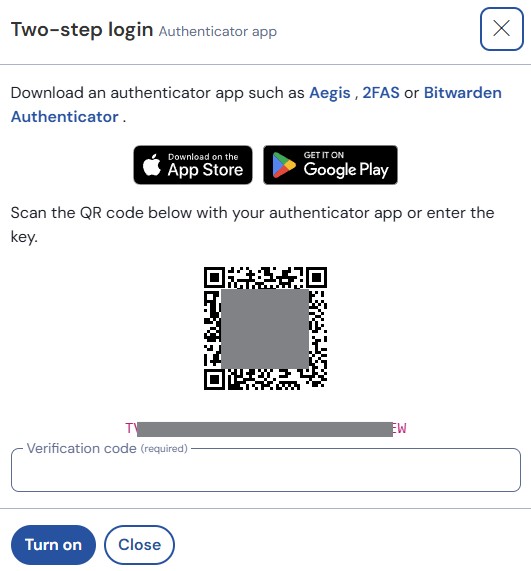
Once you've downloaded 2FAS, open it and click the + Pair new service button, then allow the app access to your camera if asked (or if you'd prefer not to, you can manually enter the key from Vaultwarden instead of scanning the QR code to connect to 2FAS). Use the camera to scan the QR code that we saw earlier in Vaultwarden. 2FAS will show a pop-up with the Vaultwarden logo, your Vaultwarden username, and a six digit code that refreshes every thirty seconds. Enter this code in the Verification code field in Vaultwarden to complete the connection.

In Vaultwarden, you'll now see a nice, green check mark next to Authenticator app, indicating that you've successfully connected your account to 2FAS. From now on, when you access Vaultwarden on a new device, you'll be asked to enter the six digit code from your authenticator app. Even if someone steals your master password, they won't be able to access your account without your phone and access to 2FAS.
Now, just in case you can't access your authenticator app and need an emergency way to access your account, you can print a recovery code. Click the View recovery code button, enter your master password, and you'll see a one-time use code. Print it and store it somewhere safe. This is only to be used as a last resort, and simply disables two-factor authentication.
Note: You'll still need your master password when logging in with a recovery code. The one-time code only bypasses the need for an authentication code, not your master password. So make sure your master password is memorable!
Setup Vaultwarden For Your Team
Now that you've got your Vaultwarden account secured, let's get it set up for the rest of your team.
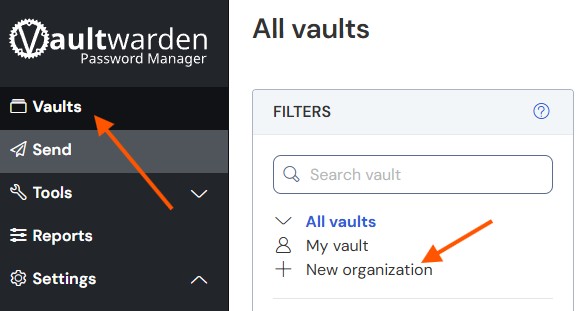
Click on Vaults in the menu on the left-hand side, then click + New Organization. Give your organization a name, then hit Submit. This will create your new organization and take you to the new Admin Console.
There are three things we'll take care of in the Admin Console:
- creating collections
- inviting new users
- setting some organization policies
Collections
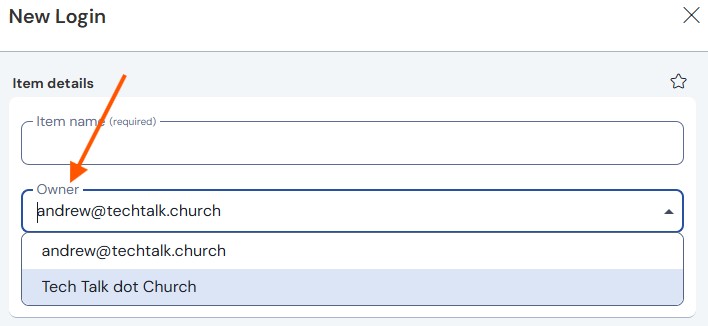
By default, when you add a new user to the organization you've just created, they will have two vaults - a personal vault and the organization vault. Within the organization vault are folders, called collections, where you can store individual login items. You can assign each user permissions to specific collections, giving you very fine control over who has access to any given group of logins.
Note: It's easy to overlook, but when adding a new item to your vault, it will default to your personal vault. If you want the login to be shared with the entire organization, or even just a subset of the organization by way of a specific collection, you need to be sure to change the owner from your account to the organization. Once the organization has been set as the owner, you'll be able to select the collection you'd like the new item to be added to.
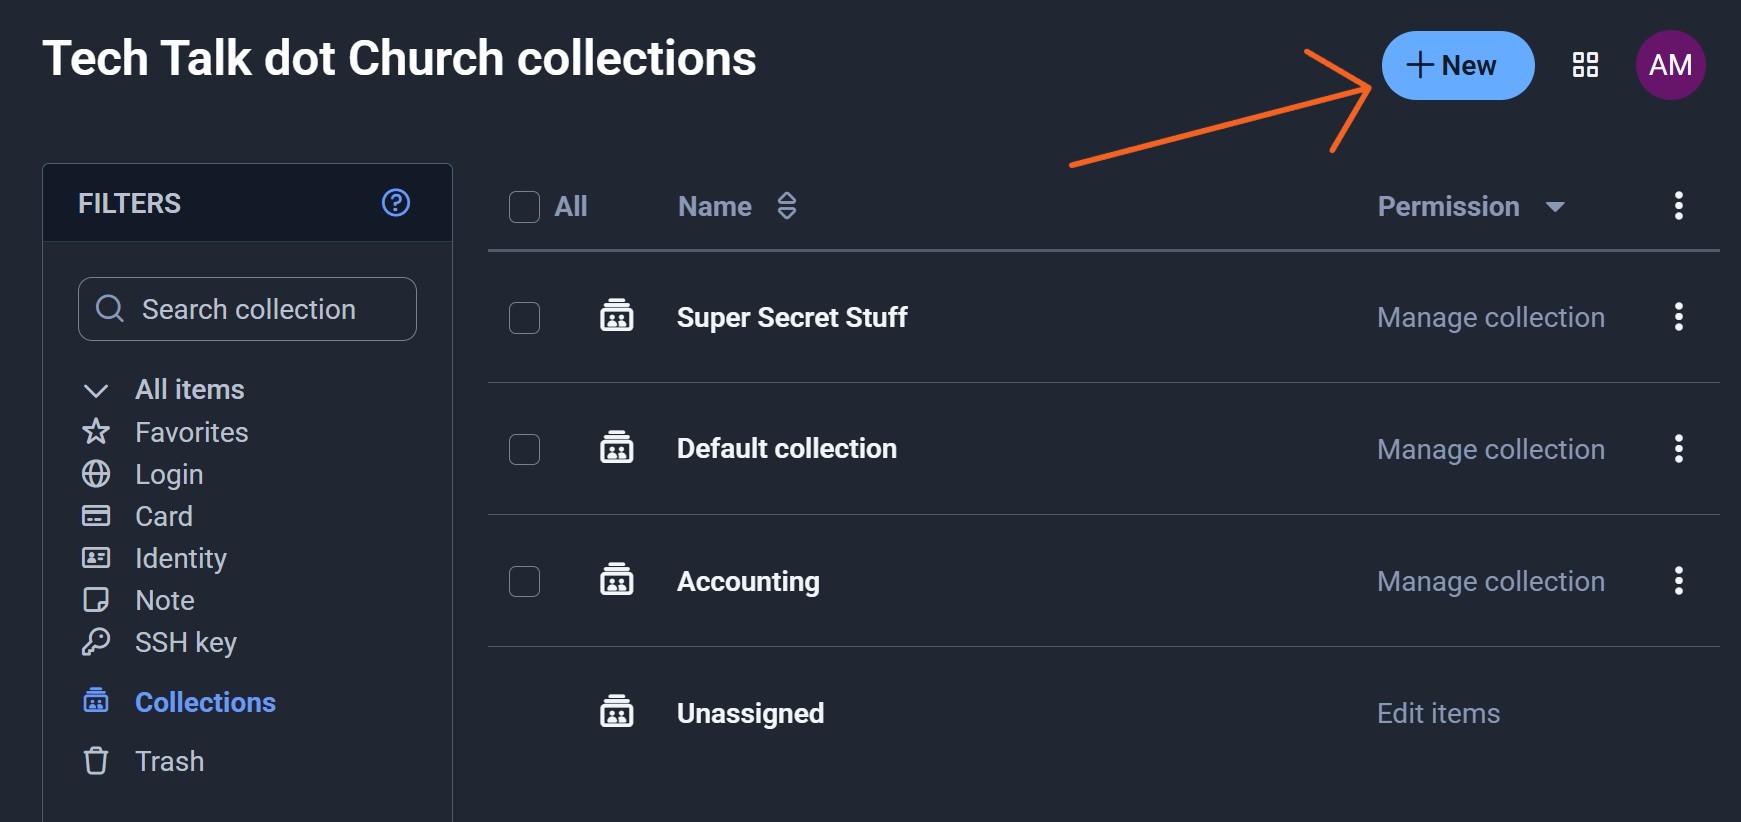
To add a new collection, click the + New button in the upper right hand side of the Admin Console and select Collection. Give the collection a name, then hit Save. You can also assign permissions to that collection, but we'll skip that for now since we have no other users.
Inviting Users
I'll say it again - before sending invite to your actual teammates, test out this step with a personal account to get a sense of the workflow. Only once you fully understand the process should you start inviting actual users. You don't want to break your team's confidence that you're moving them in the right direction with this whole password manager thing by floundering to get them setup.
Note: Inviting a new user will attempt to send an email to that user with a sign-up link. However, unless you configure Vaultwarden with an SMTP server, it has no way of actually sending an email. I'll show you how to add users without requiring the SMTP server, but we aware that if you don't set it up, Vaultwarden won't be able to send password hints to a user's email if they forget their password.
If you do want your Vaultwarden server to be able to send emails (and I highly recommend that you take the time to get this set up), then check out these instructions.
The basic steps involved in adding a new user to your organization are as follows:
- Create the new user account.
- Assign the user the desired collection permissions.
- Approve their accepted invitation in the admin console.
First, have the new user navigate to your Vaultwarden URL, then click create account. They'll then enter their email address and create a strong password. While they can enter a password hint (that can be recalled later if you've setup an SMTP server) to help them remember their password, there is no way to actually recover a forgotten master password. If a user gets locked out of their account and cannot remember their master password, the only course of action is to delete their account and create a new one.*After the account has been created, have the user login to their new account.
*Vaultwarden now has the ability to allow an admin to recover a user account. The feature, called Account Recovery Administration, can be enabled in the admin console under Settings > Policies. However, it's important to note that if you enable this feature after users have been created, they will need to opt-in to the Account Recovery option, so you'll need to instruct any existing users to do so.
Back in the admin console, you'll now click Members on the left-hand side, then click the + Invite member button at the top right. Enter the email address that they used when creating the new account, select the desired member role, then click the Collections tab.
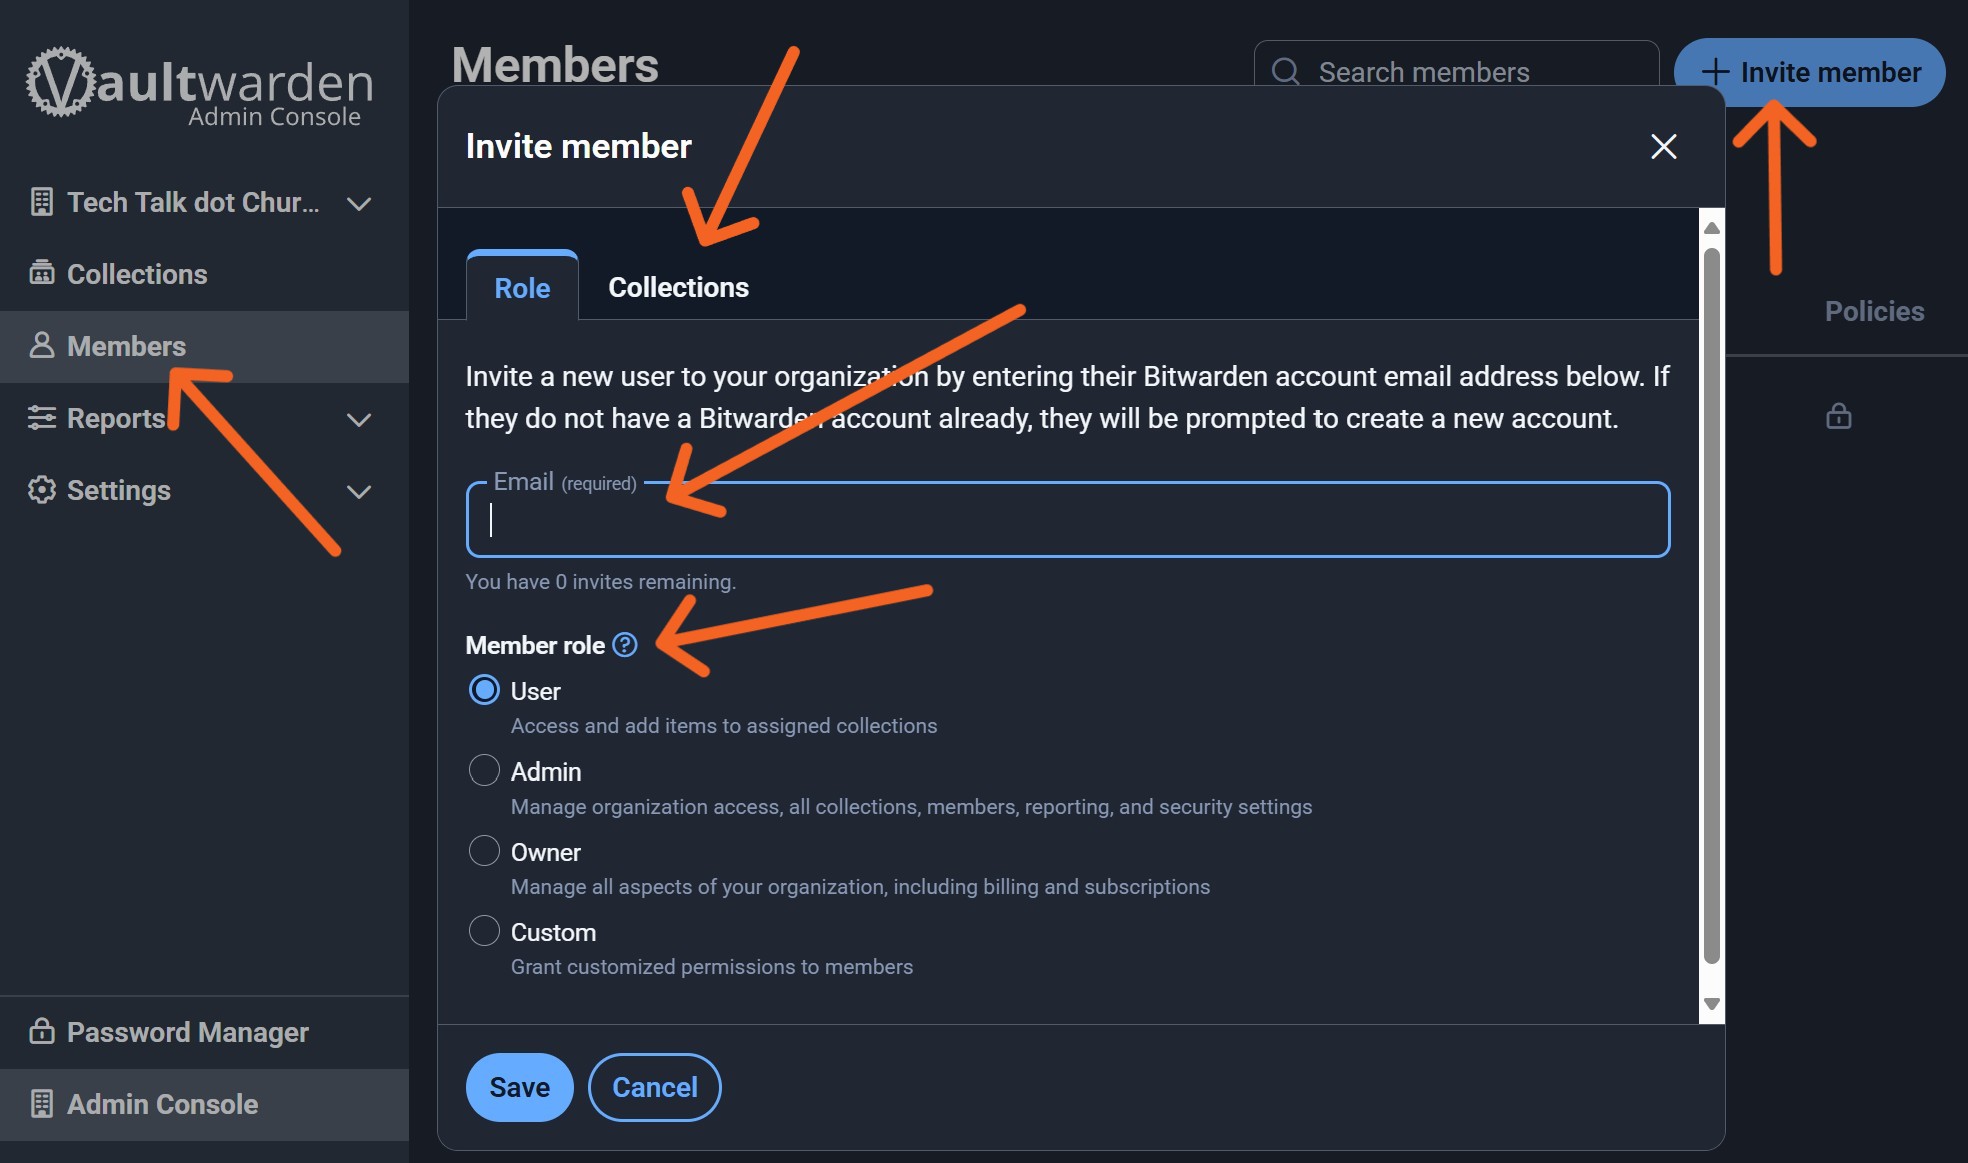
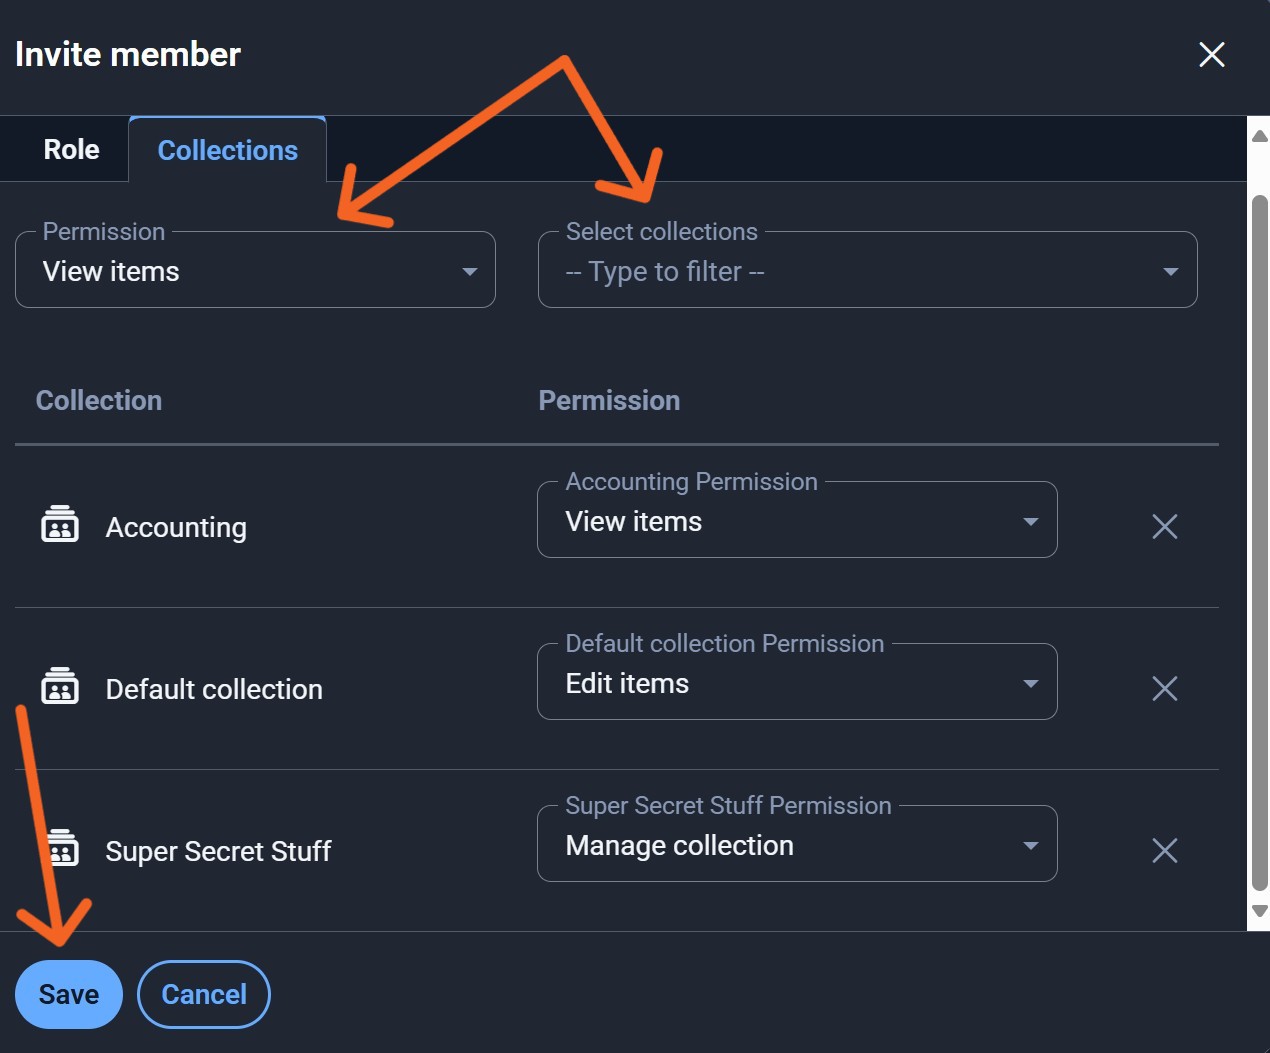
Select the collections and the desired permission for each collection you'd like to assign that user, then click the Save button at the bottom.
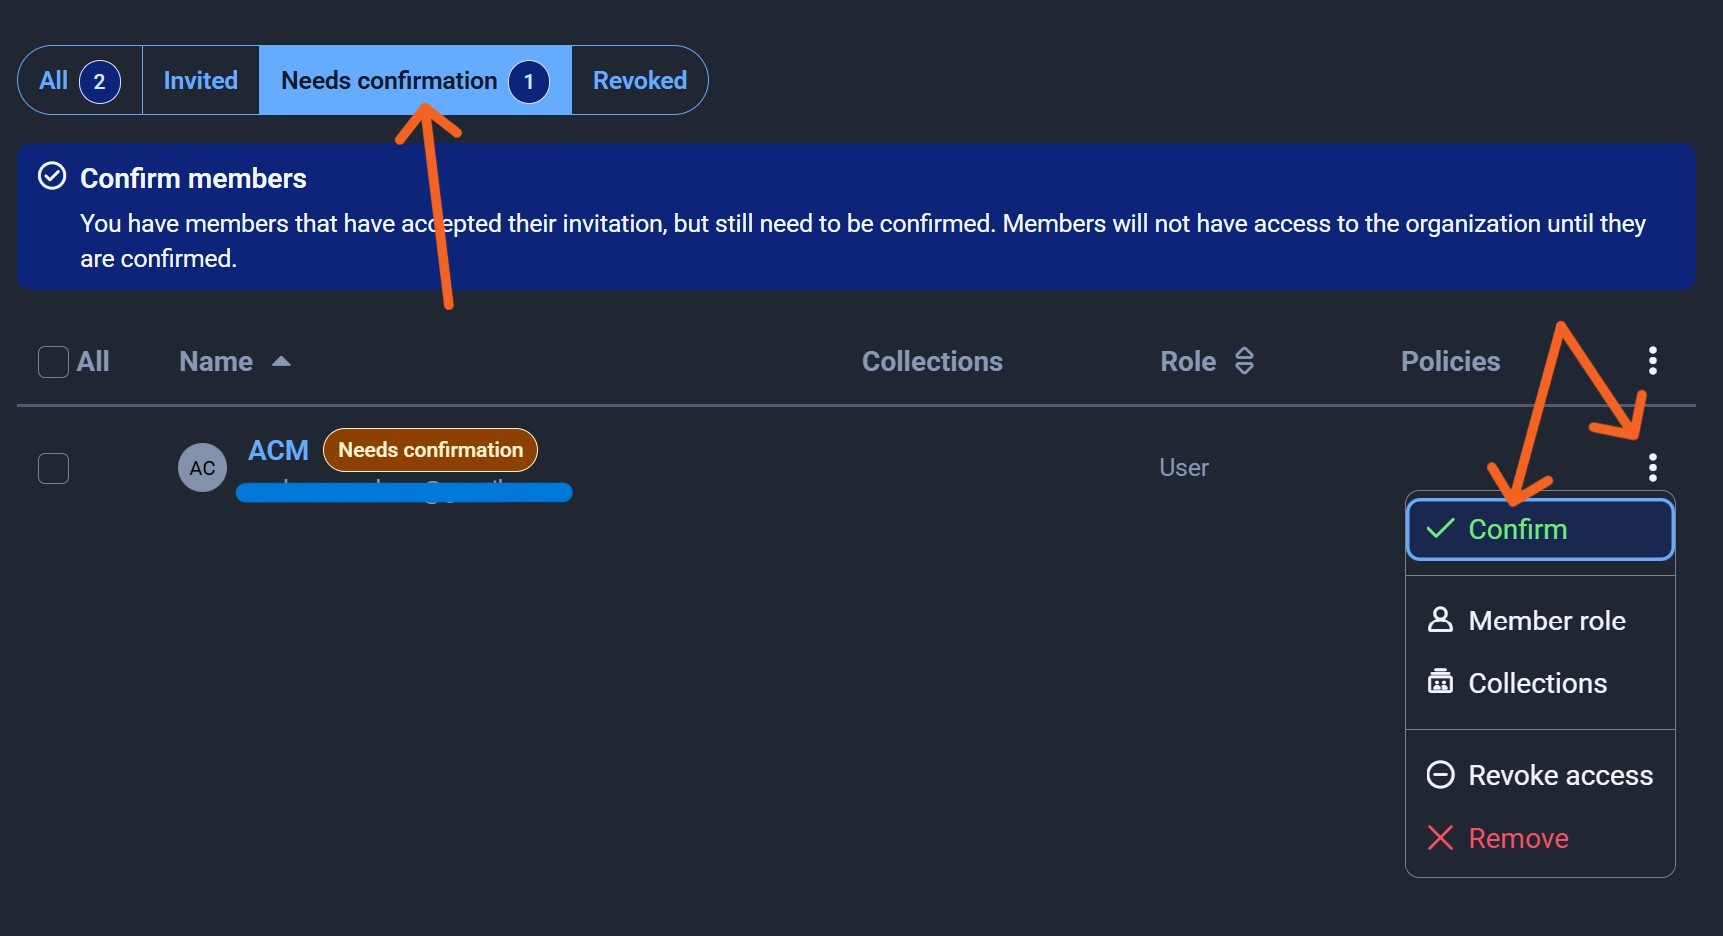
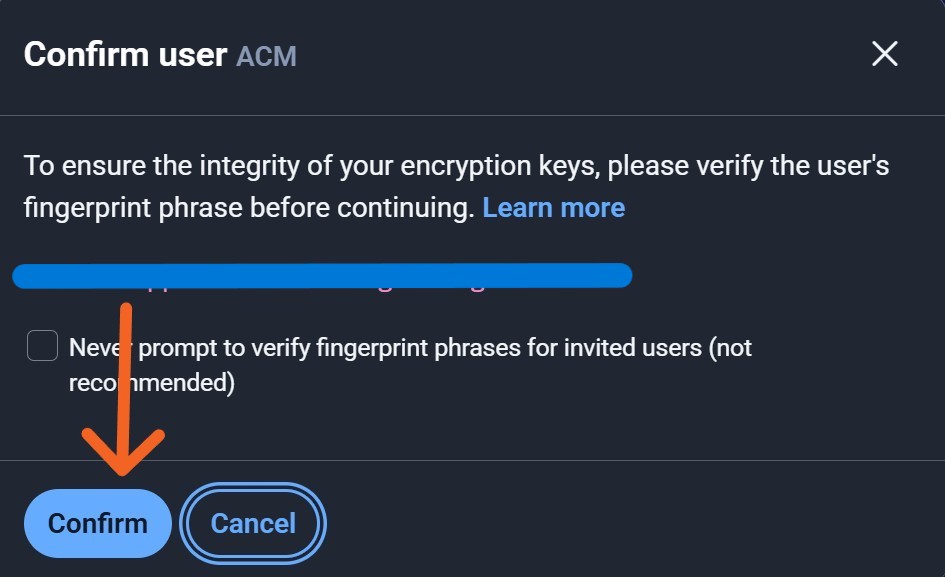
Finally, you'll need to confirm the user by clicking the three vertical dots to the right and select the green Confirm option. You'll see a pop-up window asking you to verify the user's fingerprint phrase, which can be found in their account's Settings page. However, if you've sat with the person during this whole process, you can safely confirm the prompt without verifying the fingerprint phrase.
At this point, your user is ready to go with access to your organization's collections!
Organization Policies
In the admin console, there are a variety of settings you can use to customize Vaultwarden for your organization. For example, you can require that everyone use two-factor authentication to access their Vaultwarden account (definitely a good idea, especially for any admin users), and you can set strength requirements for users' master passwords. Definitely check these out and see what would make the most sense for your team.
Appendices
PikaPods ENV VARS
There are a few additional items you'll want to set up in the Environment Variables (ENV VARS) of your Vaultwarden pod.
Enable Automatic Vault Syncing
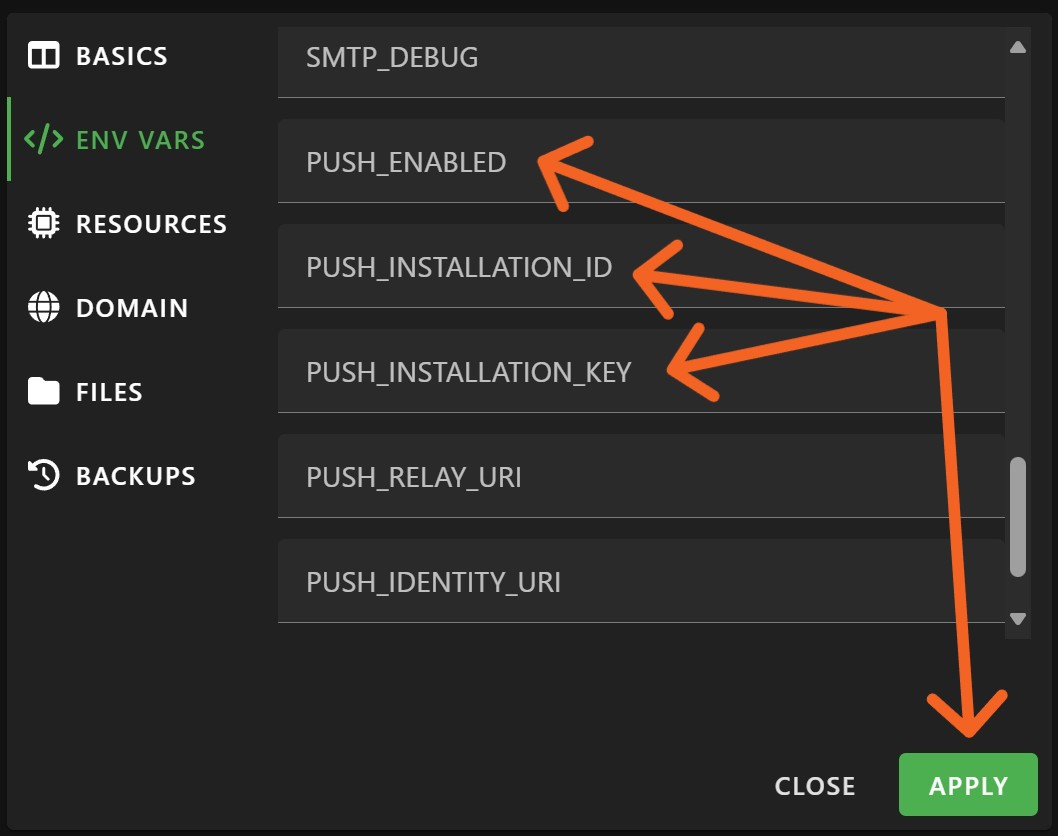
First, in order enable automatic syncing of the mobile, browser extension, and web versions of a user's Vaultwarden vault, we need to set up push notifications. Start by visiting https://bitwarden.com/host/ and entering the email address you used to create your Vaultwarden owner account and selecting the appropriate region. After pressing Submit, you'll be presented with an installation ID and key. Copy both of these values, then head back to PikaPods.
Click the settings wheel in the lower left corner of your Vaulwarden PikaPod and select the ENV VARS option. Scroll down and set PUSH_ENABLED to true, then paste the installation ID and key in the appropriate fields, then hit the Apply button.
Setup Email Sending
I won't cover this in detail because the process will look different depending on your existing email host, but there are lots of resources to help you get this setup, like this one: SMTP Configuration · dani-garcia/vaultwarden Wiki · GitHub.
Restrict Who Can Create an Account
Finally, it's probably wise to lock down who exactly can sign up to use your Vaultwarden server, unless you're planning to host it for absolutely anyone on the internet who happens upon it. The first couple options in your pod's ENV VARS allow you to customize this.
- Setting SIGNUPS_ALLOWED to false will prevent anyone from signing up for a user account on your Vaultwarden server. This means that you'll need to specifically invite a user from the admin console before they'll be able to create an account.
- Setting SIGNUPS_DOMAIN_WHITELIST to a specific domain (like techtalk.church) will only allow users to sign up using an email address at that domain. However, if you have lots of volunteers who will need access to Vaultwarden and who do not have email address with your church's domain, you'll want to keep this option disabled.
Using these two settings in combination should secure your pod well and ensure that only people that you intend to will be able to create an account.
Best Practices When Using a Shared Password Manager
I'll end with some general rules and tips that can be helpful when using something like Vaultwarden with a team.
- When adding new logins to the vault:
- If it's something only that user will ever need to access, keep that user set as the item's owner.
- If it's something that someone else might ever need to access, change the item's owner to the organization and add it to the proper collection.
- Following this advice will likely mean that most vault items will be owned by the organization and not by individual users.
- Remind your team members of this rule again and again. Otherwise it's easy to overlook changing the item's owner when adding a new item.
- Prevent the possibility of getting locked out of accounts and services.
- Never be the only person with access to an account or services.
- If an account is authenticated via one-time text codes, include an office phone number that codes can be sent to, or utilize at least two personal cell numbers.
- When a service supports multiple user accounts, take advantage of it. Avoid sharing a single login with multiple users when possible. This makes it much easier to add and remove access for specific people when needed.
- Enable multi-factor authentication on every account where it's available, preferably using a Time-Based One-Time Password (TOTP).
- This is a completely different rabbit hole, but if your team members are using Apple devices, consider managed AppleIDs for your organization's domain.
- Be aware that MFA for personal AppleIDs is only available using one-time codes sent via text, or by using another Apple device tied to the account. Apple does not allow authentication via any 3rd party authenticator apps.
- Managed AppleIDs, on the other hand, can be authenticated via single sign-on. For example, if your organization uses Microsoft or Google, a user can log into their AppleID using their Microsoft or Google credentials.
- Print and store backups codes, especially for your password manager, in a safe and secure location.
- Periodically refresh these codes and re-print them.
Conclusion
This was a long one. The more I wrote, the more I felt I needed to include. And I've only provided a single option of countless ways you could improve account security for your team. But I hope it at least provides a starting point for you and your team to implement some better password practices that not only provide better security, but also less headaches and frustrations.
Finally, I'll mention a few things I didn't cover in this article, partly because this article needs to end at some point, but also because there are plenty of resources that already exist and are only a quick [insert your favorite search engine here] search away.
- adding the Bitwarden extension to a browser and connecting it to your Vaultwarden server
- adding new items to your vault
- configuring the Bitwarden browser extension settings (autofill, security, etc.)
- automatic backup of your Vaultwarden pod
- periodically exporting and backing up your Vaultwarden vault
If you'd like to discuss any of this in more detail, or have questions or thoughts, send me an email at [email protected].